


Healing Caps vs. Cover Screws: What’s the Difference and When to Use Each?
Dental Team | February 16, 2025
CoverScrews, DentalImplants, HealingAbutments, HealingCaps, Implantology, ImplantSuccess, OEMDent, SurgicalTips
Alright, let’s talk about two tiny, but super important, components in dental implantology: healing caps and cover screws. I know you might think something along the lines of, “Eh, they’re just small parts, does it even matter which one I use?”. But oh, it matters - A lot.
At OEMDent, we’ve seen enough cases to know that choosing the right component at the right time can make or break an implant’s success.
So let’s break it down in plain English: what these little guys do, when you need them, and why getting it right is crucial.
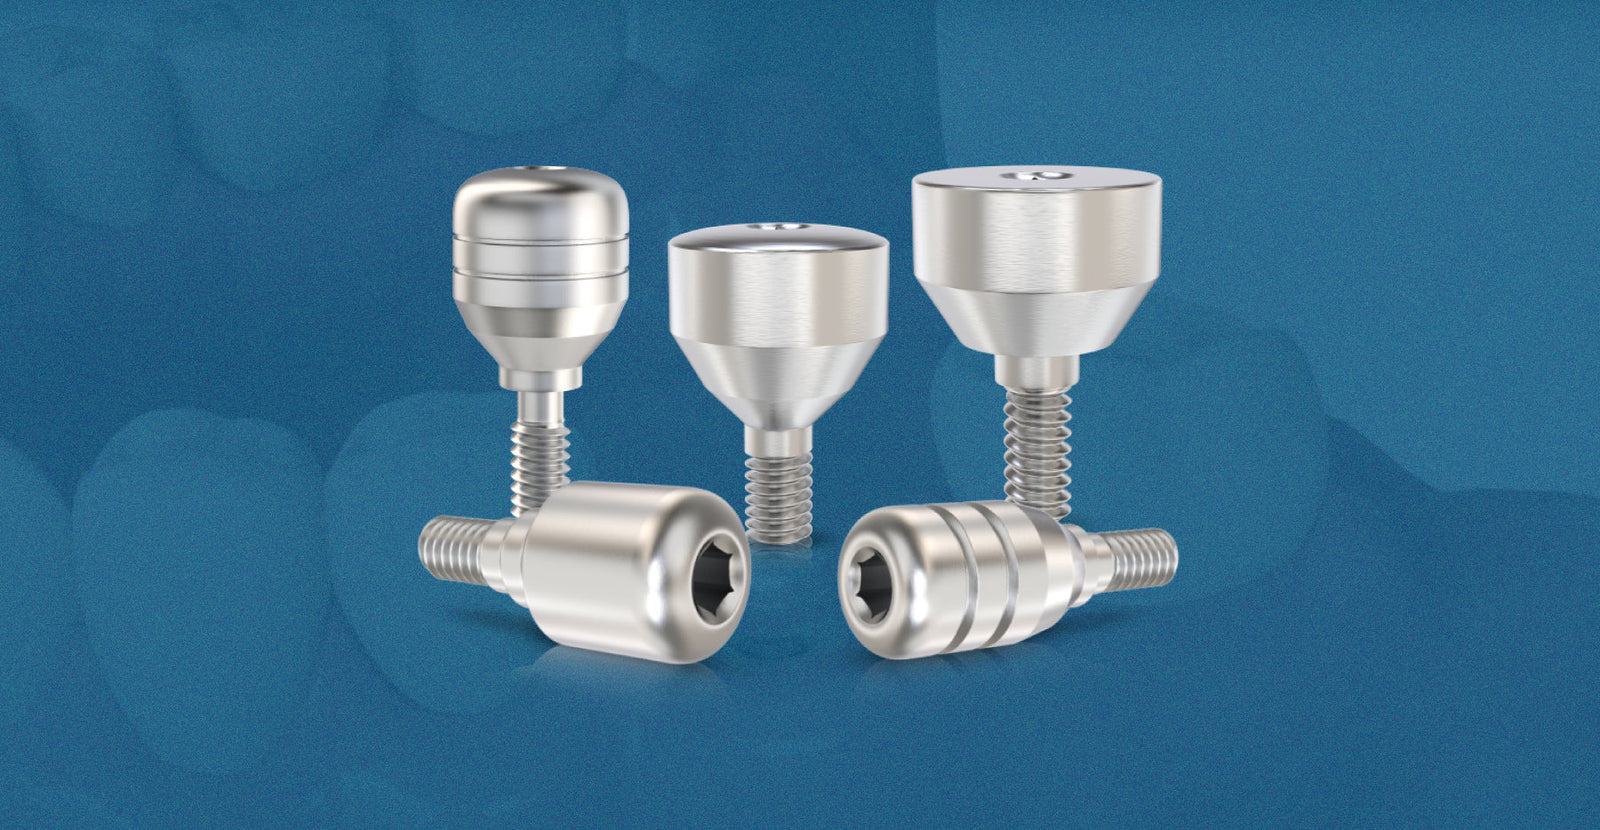
What is a Cover Screw?
Think of a cover screw like a lid on a jar. It’s a tiny, flat screw that sits on top of an implant after placement, sealing it off and keeping everything clean while the bone heals around it.
Why Use a Cover Screw?
-
It keeps things safe and clean. No food, bacteria, or unwanted junk gets into the implant while the bone is doing its thing.
-
It lets the implant heal quietly. Since the cover screw is fully submerged under the gums, the implant stays undisturbed during osseointegration.
-
It reduces risks. Less exposure means fewer chances of complications, infections, or unwanted movement that could mess with stability.
When Do You Use It?
Cover screws are the go-to for two-stage implant procedures - meaning the implant gets placed, covered, and left alone for a few months while the bone heals. This is the right move when:
-
The implant needs to be completely protected during healing.
-
There’s low primary stability, and you want zero movement.
-
The tissue is thick enough that burying the implant is a better option.
Fast forward a few months, once the bone has fused nicely, you remove the cover screw and swap in a healing cap to prep the area for the final crown.
What is a Healing Cap?
A healing cap (or healing abutment) is the opposite of a cover screw - instead of hiding under the gums, it sticks out above them. Why? Because its job is to help shape the soft tissue, getting it ready for the final restoration.
Why Use a Healing Cap?
-
It shapes the gums. No weird tissue collapse, no awkward contours - just a smooth, natural-looking emergence profile for your crown.
-
It speeds things up. If used in a one-stage implant procedure, it means skipping an extra surgery.
-
It makes life easier. The implant stays accessible, making impressions and prosthetic placement smoother.
When Do You Use It?
-
After healing in a two-stage procedure. The implant has been chilling under a cover screw for months, and now it’s time to prep the gums for the final crown.
-
Immediately in a one-stage procedure. The implant is placed, and instead of covering it up, a healing cap goes on right away, saving time and a second surgery.
-
When gum shaping is needed. Healing caps create a smooth transition from implant to prosthetic, ensuring an aesthetic and functional result.
It’s important to note that while cover screws have the same shape and the only change is the platform you’re using (internal hex vs. conical and size variations), healing caps come in different shapes and sizes that depend on the type of system you are using and the way you want the gums to close in the patient’s mouth.
Cover Screw vs. Healing Cap: What are the Differences?
|
Feature |
Cover Screw |
Healing Cap |
|
Placement Time |
Right after implant surgery (two-stage) |
After healing OR immediately (one-stage) |
|
Purpose |
Seals and protects the implant |
Shapes the gums for final prosthesis |
|
Visibility |
Hidden under gum tissue |
Sticks out above the gums |
|
Need for Second Surgery? |
Yes, to uncover the implant |
No, if used in a one-stage approach |
|
Best for |
Healing phase without disturbance |
Soft tissue contouring for aesthetics |
Real-World Case: Why This Matters
Let’s talk about Dr. K, one of our go-to implant dentists. She had a patient, let’s call him Joe, who needed a lower molar implant. Since Joe’s bone density was on the lower side, Dr. K went for a two-stage approach:
-
Placed the implant with a cover screw → Gave it time to heal, zero disturbances.
-
Four months later, swapped in a healing cap → Started shaping the gums.
-
Final restoration went in seamlessly → Joe left happy, with a perfectly contoured crown that looked and felt natural.
Had she skipped the cover screw and gone straight to a healing cap? Risk of failure. Had she kept the cover screw too long? Gum collapse could’ve made prosthetic placement a nightmare.
This is why choosing the right component matters.
So… Which One Should You Use?
Let’s keep it simple:
-
If the implant needs time to heal beneath the gums? Use a cover screw.
-
If you want to shape the gums and prep for the final crown? Use a healing cap.
-
If you want to skip the second surgery? Use a healing cap from the start (one-stage procedure).
-
If infection or premature exposure is a concern? Stick with a cover screw until it’s safe to uncover.
At OEMDent, we’ve got you covered - literally. Whether you need cover screws, healing caps, or a complete implant system, we supply high-quality components that make your cases smoother and more predictable.
Mastering Incision Placement & Healing Abutment Selection for Implant Success
Let’s be real - when it comes to implants, small mistakes can have big consequences. And if you’re not strategic about where you make your incision or which healing abutment you use, you’re setting yourself up for complications like poor soft tissue adaptation, bone loss, or even peri-implantitis. Nobody wants that.
At OEMDent, we’re all about making implant procedures predictable, smooth, and successful - and that starts with smart incision planning and abutment selection. Let’s break down the best practices to help you achieve long-term success for your implant cases.
Incision Placement: Why It Matters More Than You Think
Most new implantologists don’t give much thought to exactly where they’re making their incision. They aim for mid-crestal, place the implant, suture up, and call it a day. Big mistake.
If you place your incision directly over the implant, you’re running the risk of tissue dehiscence - which means that after inflammation comes and goes, your beautifully placed implant might end up partially exposed. And once bacteria sneaks in? Say hello to bone loss before osseointegration even happens.
The Smarter Approach: A Slightly Lingualized Incision
Instead of cutting dead-center on the ridge, aim to make your incision about 1–2mm lingual to the mid-crest. Why?
-
It preserves more buccal tissue, which is crucial for long-term implant stability and aesthetics.
-
If the incision does open slightly during healing, it’s not directly over the implant (reducing the risk of bacterial contamination).
-
It helps the soft tissue drape more naturally over the implant, preventing complications like tissue collapse.
In a nutshell: mid-crestal is fine, but slightly lingual is better.
Healing Abutment vs. Cover Screw: When to Use Each
Now that your implant is placed correctly, the next decision is just as critical - do you go with a cover screw or a healing abutment? Let’s clear this up.
Healing Abutments: The Preferred Choice (Most of the Time)
If your implant achieves at least 25 Ncm of torque, congratulations - you can place a healing abutment immediately.
Why healing abutments are usually the way to go:
✔️ They eliminate the need for a second surgery - the tissue heals around them, saving your patient an extra procedure.
✔️ They help guide soft tissue formation - ensuring a smooth transition for the final prosthesis.
✔️ If properly sized, they prevent soft tissue overgrowth - which means easier impressions and seating of the final crown.
When to Opt for a Cover Screw Instead
Cover screws still have their place - mainly when implant stability is questionable (think less than 25 Ncm torque or very soft bone). If the implant isn’t fully stable, burying it under the soft tissue allows undisturbed osseointegration before re-exposure.
However, if you go this route, incision placement is even more critical - you want to ensure full tissue coverage so there’s no chance of early exposure.
Choosing the Right Healing Abutment Height: Don’t Mess This Up
Too short? Tissue will overgrow it, making the next step a nightmare. Too tall? You’ll get tissue bunching, creating gaps where bacteria love to party.
The Right Way to Pick Healing Abutment Height:
-
Use a tissue height measuring tool to determine the vertical space between the top of the implant and the soft tissue.
-
If your implant is 1mm below the bone, and you have 2mm of soft tissue, you need a 3.5mm healing abutment - simple math.
-
When in doubt, err on the side of slightly taller rather than too short. A healing abutment that sits too low can trap bacteria and lead to early implant failure.
A Common Mistake to Avoid:
Many clinicians instinctively grab a 2.5mm healing abutment - thinking it’ll be “safe.” But if the tissue grows over it, you’ll be digging it out later. Instead, choosing a 3.5mm or 4.5mm height helps maintain access and reduces the risk of soft tissue complications.
Suturing Tips: Locking It All in Place
Once you’ve placed your implant and healing abutment, your suturing game needs to be on point. Sloppy suturing = an unhappy implant.
Key Suturing Takeaways:
✔️ Always grab at least 3mm beyond the keratinized tissue border to ensure a secure hold.
✔️ Use a PGCL or Glycolon suture - these hold well but resorb in a predictable manner.
✔️ Make sure your sutures lie flat and secure - if they’re loose or bunched, the tissue won’t heal properly.
✔️ After suturing, test the stability of the soft tissue by lightly pressing with an instrument - if it moves, you need to tighten up.
Final Thoughts: Why This Isn’t Just Small Stuff
Yeah, these pieces are tiny. But get them wrong, and you could be dealing with delayed healing, implant failure, or a seriously frustrated patient.
Cover screws and healing caps aren’t just accessories - they’re essential steps in the implant journey. And whether you’re placing implants daily or just getting into implantology, understanding when and why to use each can make all the difference.
To sum it up: success in implant surgery isn’t about big, dramatic moves - it’s about getting the small details right every single time.
Here’s the winning formula:
✅ Lingualized incisions for better soft tissue coverage
✅ Healing abutments whenever possible to avoid extra surgery
✅ Correct abutment height to prevent overgrowth and bacteria traps
✅ Meticulous suturing to lock everything in place
At OEMDent, we provide precision-engineered healing abutments, cover screws, and surgical tools to help you make your next implant case as smooth as possible and make every implant case a success.
If you’re looking for high-quality components that deliver predictable results, check out our selection today!
Got questions? Curious about the best approach for a tricky case? We’re here to help - you can contact us via email or via whatsapp.

OEMDent.com offers uncompromised quality, cost-effective dental implants & prosthetics compatible with leading implant systems. We go beyond manufacturing, offering OEM & Private Label services to meet your dental needs.
Continue reading
View all-

-

MIS® Seven Compatible Abutments: What Labs Need to Know About Fit, Torque, and Connection Accuracy
Dr. Samuel Pacheco (DDS) |
-

-
Private Label Dental Implants: How Distributors Build Their Own Brand With OEM Dent
Dr. Samuel Pacheco (DDS) |
-

Nobel Active® Compatible Implants: Balancing Precision and Affordability
Dr. Samuel Pacheco (DDS) |
-

From CAD Design to Clinical Reality: The Role of STL Files in Modern Implant Production
Dr. Samuel Pacheco (DDS) |
-
From STL to Implant: How OEM Dent Custom Manufacturing Works
Dr. Samuel Pacheco (DDS) |
-

Titanium Grade 5 vs. CP Titanium: Choosing the Right Alloy for Implants
Dr. Samuel Pacheco (DDS) |


